
Use Managed Identity with Microsoft Teams on Azure Automation

Hi All,
Hopefully you already know, that the Run As Accounts in Azure Automation will retire by end of September 2023. Therefore you have to migrate to Managed Identitys.
Azure Automation Run As accounts will retire on 30 September 2023 and completely move to Managed Identities. All runbook executions using RunAs accounts, including Classic Run As accounts wouldn’t be supported after this date. Starting 01 April 2023, the creation of new Run As accounts in Azure Automation will not be possible.
I’ve already blogged, how to use Managed Identity with Exchange Online on Azure Automation.
This time, i’ll show you how to use Managed Identity with Microsoft Teams on Azure Automation.
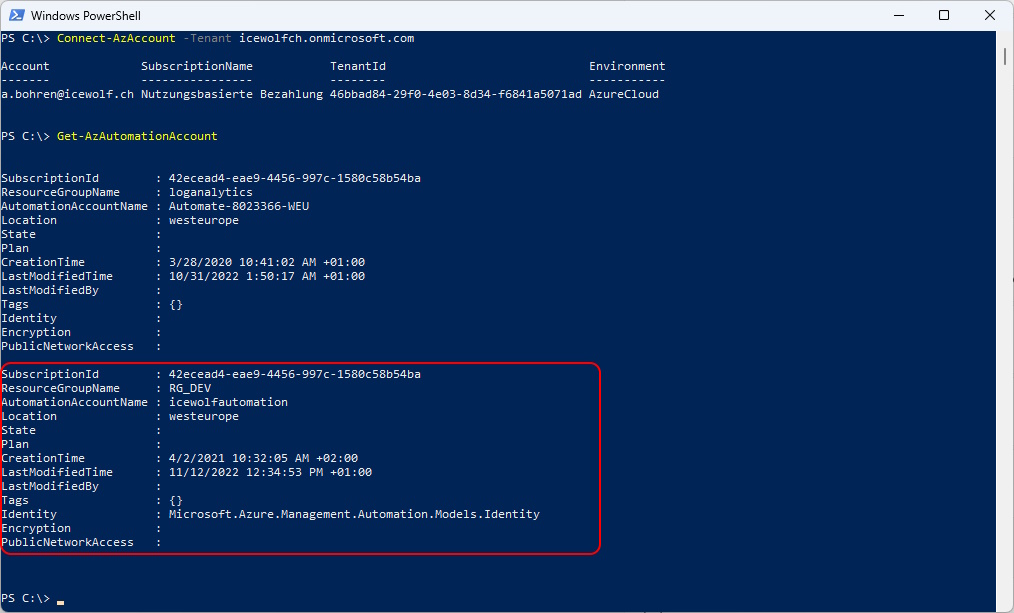
Azure Automation Account
To view the Azure Automation Account with Powershell i use the AZ PowerShell Module.
I’ve already created an Azure Automation Account for several Runbooks.
###############################################################################
#Connect to Azure
###############################################################################
Connect-AzAccount -Tenant icewolfch.onmicrosoft.com

###############################################################################
#Get Automation Account
###############################################################################
Get-AzAutomationAccount
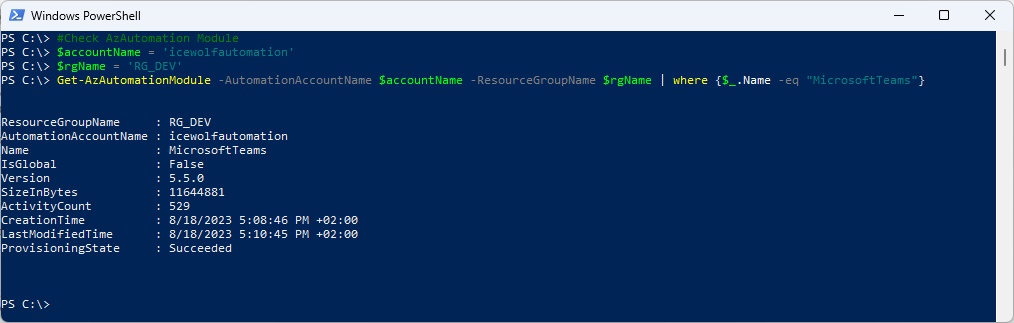
PowerShell Module on the Azure Automation Account
Let’s check the Module on the Automation Account
###############################################################################
#Check AzAutomation Module
###############################################################################
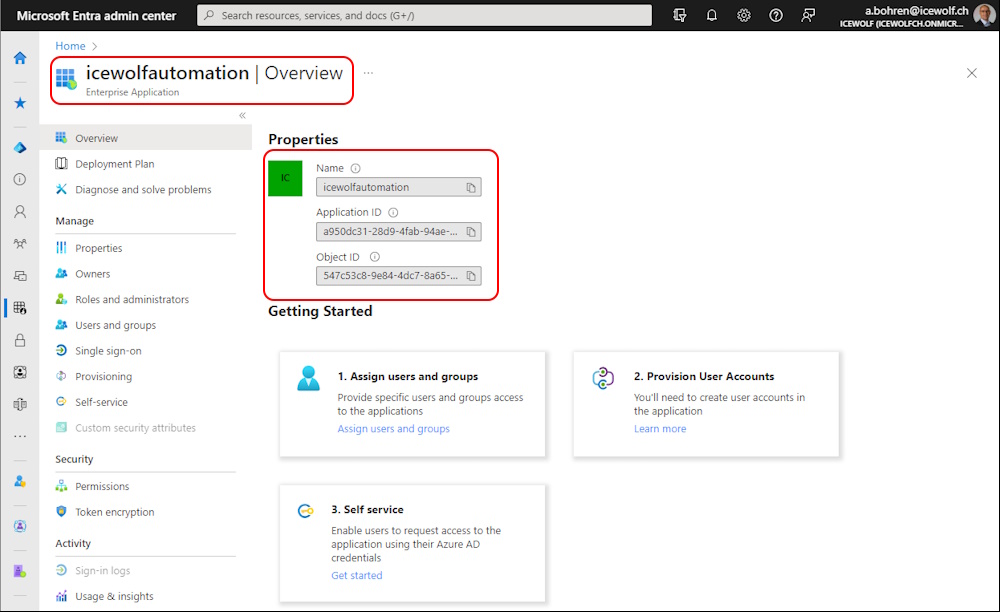
$accountName = 'icewolfautomation'
$rgName = 'RG_DEV'
Get-AzAutomationModule -AutomationAccountName $accountName -ResourceGroupName $rgName | where {$_.Name -eq "MicrosoftTeams"}
Managed Idenntity & Service Principal
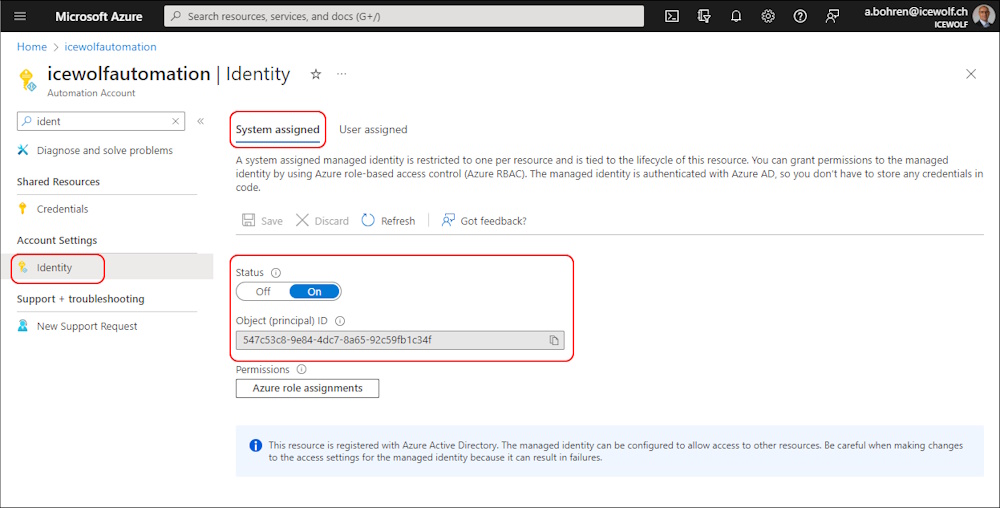
I have already enabled the Managed Identity on the Azure Automation Account
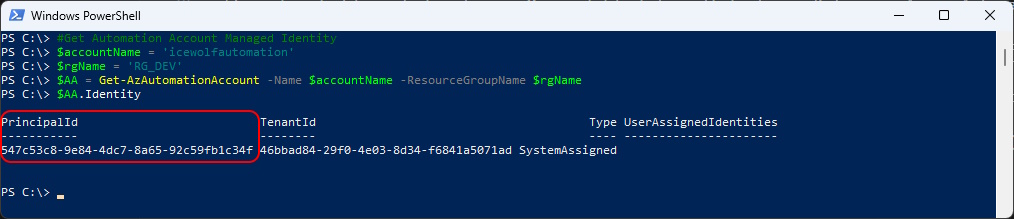
You will get the same ObjectId / PrincipalID with the following Command
###############################################################################
#Get Automation Account Managed Identity
###############################################################################
$accountName = 'icewolfautomation'
$rgName = 'RG_DEV'
$AA = Get-AzAutomationAccount -Name $accountName -ResourceGroupName $rgName
$AA.Identity
Can find the ServicePrincipal also with PowerShell and Microsoft.Graph PowerShell Modules
###############################################################################
# Connect to Microsoft Graph
###############################################################################
Connect-MgGraph -Scopes Application.ReadWrite.All

###############################################################################
# Get Service Principal using objectId
###############################################################################
$SP = Get-MgServicePrincipal -all | where {$_.DisplayName -eq "icewolfautomation"}
$SPID = $SP.Id
$SPID

You can find the ServicePrincipal also in Entra Enterprise Application
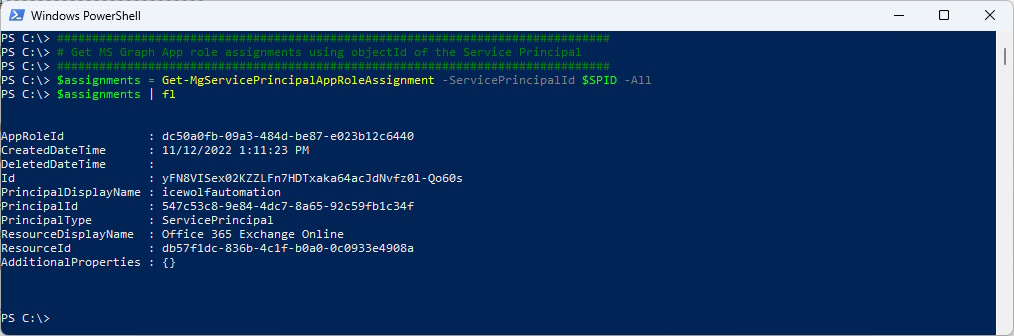
Getting Permissions for Service Principal
Now let’s figure out the Permissions assigned to the Service Principal
###############################################################################
# Get MS Graph App role assignments using objectId of the Service Principal
###############################################################################
$assignments = Get-MgServicePrincipalAppRoleAssignment -ServicePrincipalId $SPID -All
$assignments | fl
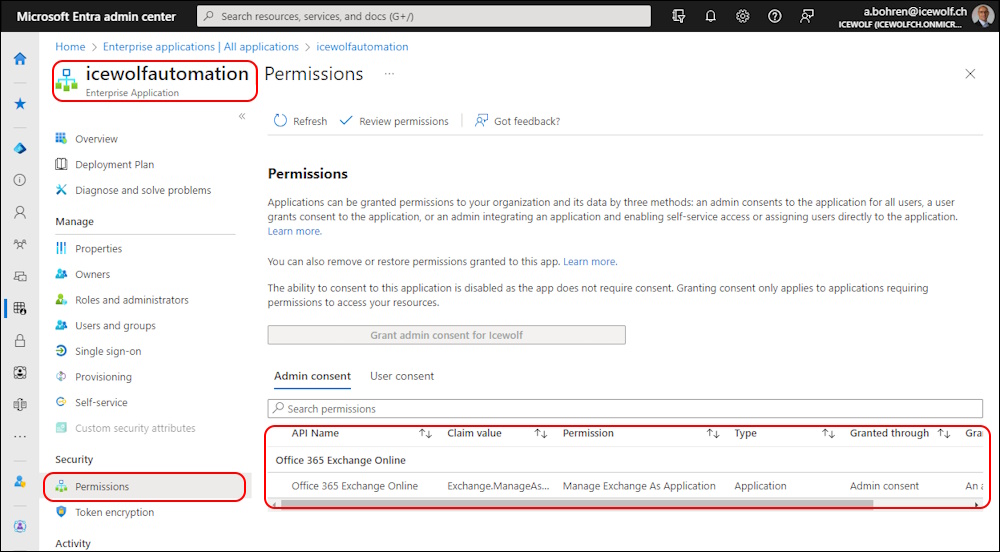
The Permissions are also visible in Entra Enterprise Application
Adding Permissions
According to Application-based authentication in Teams PowerShell Module we need the following Microsoft Graph Permissions:
- Organization.Read.All
- User.Read.All
- Group.ReadWrite.All
- AppCatalog.ReadWrite.All
- TeamSettings.ReadWrite.All
- Channel.Delete.All
- ChannelSettings.ReadWrite.All,
- ChannelMember.ReadWrite.All
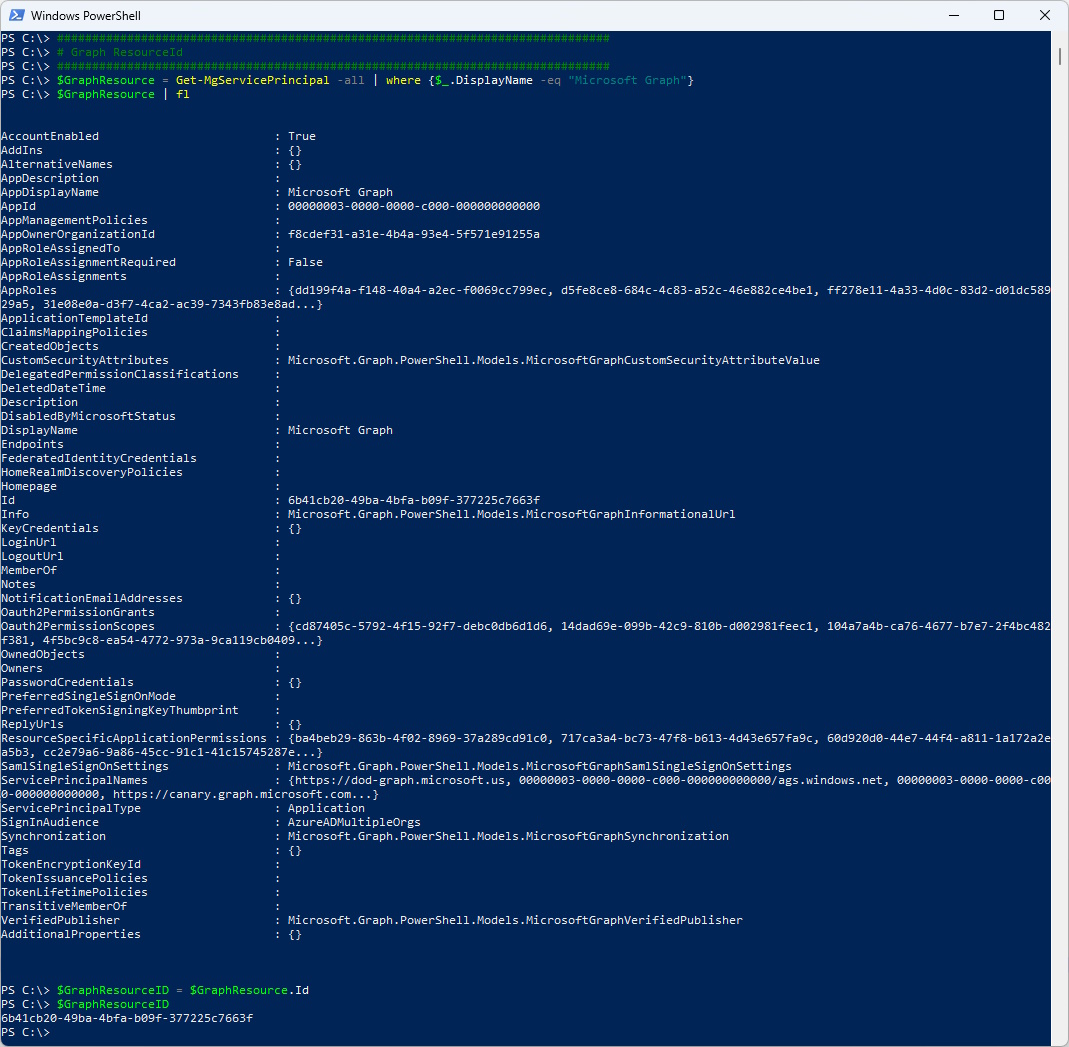
First we need the “Microsoft Graph” Resource ID. We can get it with the following command.
###############################################################################
# Graph ResourceId
###############################################################################
$GraphResource = Get-MgServicePrincipal -all | where {$_.DisplayName -eq "Microsoft Graph"}
$GraphResource | fl
$GraphResourceID = $GraphResource.Id
$GraphResourceID
I had to figure out the Permissions, i hat to dig into Microsoft Graph permissions reference and get the Application ID’s from there
| Permission name | Type | ID |
|---|---|---|
| Organization.Read.All | Application | 498476ce-e0fe-48b0-b801-37ba7e2685c6 |
| User.Read.All | Application | df021288-bdef-4463-88db-98f22de89214 |
| Group.ReadWrite.All | Application | 62a82d76-70ea-41e2-9197-370581804d09 |
| AppCatalog.ReadWrite.All | Application | dc149144-f292-421e-b185-5953f2e98d7f |
| TeamSettings.ReadWrite.All | Application | bdd80a03-d9bc-451d-b7c4-ce7c63fe3c8f |
| Channel.Delete.All | Application | 6a118a39-1227-45d4-af0c-ea7b40d210bc |
| ChannelSettings.ReadWrite.All | Application | 243cded2-bd16-4fd6-a953-ff8177894c3d |
| ChannelMember.ReadWrite.All | Application | 35930dcf-aceb-4bd1-b99a-8ffed403c974 |
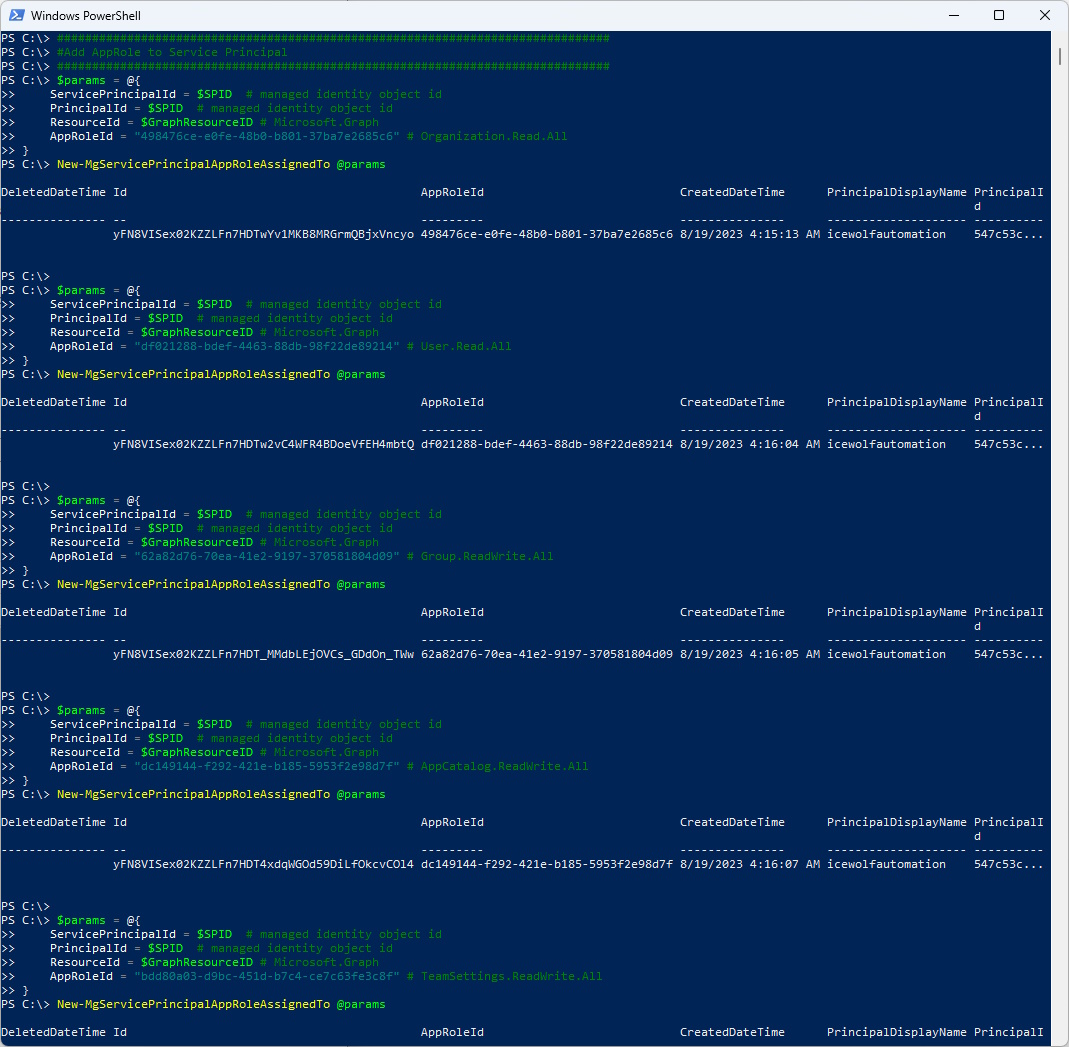
Now we can add those AppRoles to the Service Principal
###############################################################################
#Add AppRole to Service Principal
###############################################################################
$params = @{
    ServicePrincipalId = $SPID  # managed identity object id
    PrincipalId = $SPID  # managed identity object id
    ResourceId = $GraphResourceID # Microsoft.Graph
    AppRoleId = "498476ce-e0fe-48b0-b801-37ba7e2685c6" # Organization.Read.All
}
New-MgServicePrincipalAppRoleAssignedTo @params

$params = @{
    ServicePrincipalId = $SPID  # managed identity object id
    PrincipalId = $SPID  # managed identity object id
    ResourceId = $GraphResourceID # Microsoft.Graph
    AppRoleId = "df021288-bdef-4463-88db-98f22de89214" # User.Read.All
}
New-MgServicePrincipalAppRoleAssignedTo @params

$params = @{
    ServicePrincipalId = $SPID  # managed identity object id
    PrincipalId = $SPID  # managed identity object id
    ResourceId = $GraphResourceID # Microsoft.Graph
    AppRoleId = "62a82d76-70ea-41e2-9197-370581804d09" # Group.ReadWrite.All
}
New-MgServicePrincipalAppRoleAssignedTo @params

$params = @{
    ServicePrincipalId = $SPID  # managed identity object id
    PrincipalId = $SPID  # managed identity object id
    ResourceId = $GraphResourceID # Microsoft.Graph
    AppRoleId = "dc149144-f292-421e-b185-5953f2e98d7f" # AppCatalog.ReadWrite.All
}
New-MgServicePrincipalAppRoleAssignedTo @params

$params = @{
    ServicePrincipalId = $SPID  # managed identity object id
    PrincipalId = $SPID  # managed identity object id
    ResourceId = $GraphResourceID # Microsoft.Graph
    AppRoleId = "bdd80a03-d9bc-451d-b7c4-ce7c63fe3c8f" # TeamSettings.ReadWrite.All
}
New-MgServicePrincipalAppRoleAssignedTo @params

$params = @{
    ServicePrincipalId = $SPID  # managed identity object id
    PrincipalId = $SPID  # managed identity object id
    ResourceId = $GraphResourceID # Microsoft.Graph
    AppRoleId = "6a118a39-1227-45d4-af0c-ea7b40d210bc" # Channel.Delete.All
}
New-MgServicePrincipalAppRoleAssignedTo @params

$params = @{
    ServicePrincipalId = $SPID  # managed identity object id
    PrincipalId = $SPID  # managed identity object id
    ResourceId = $GraphResourceID # Microsoft.Graph
    AppRoleId = "243cded2-bd16-4fd6-a953-ff8177894c3d" # ChannelSettings.ReadWrite.All
}
New-MgServicePrincipalAppRoleAssignedTo @params

$params = @{
    ServicePrincipalId = $SPID  # managed identity object id
    PrincipalId = $SPID  # managed identity object id
    ResourceId = $GraphResourceID # Microsoft.Graph
    AppRoleId = "35930dcf-aceb-4bd1-b99a-8ffed403c974" # ChannelMember.ReadWrite.All
}
New-MgServicePrincipalAppRoleAssignedTo @params
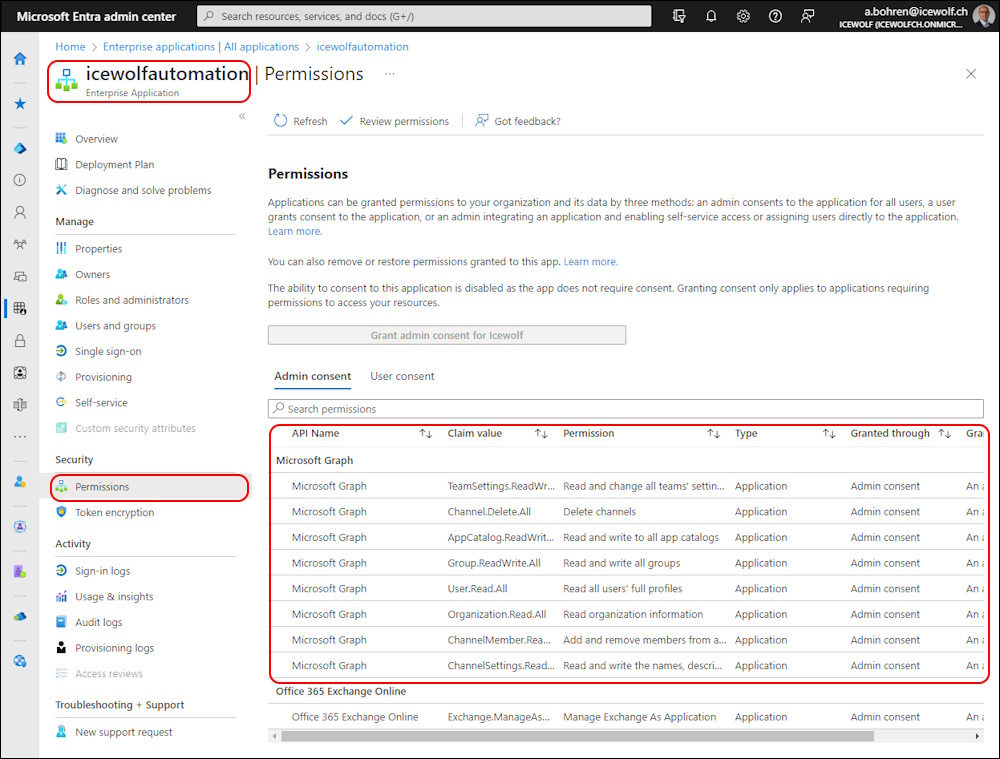
These permissions are now visible in Entra Enterprise Application
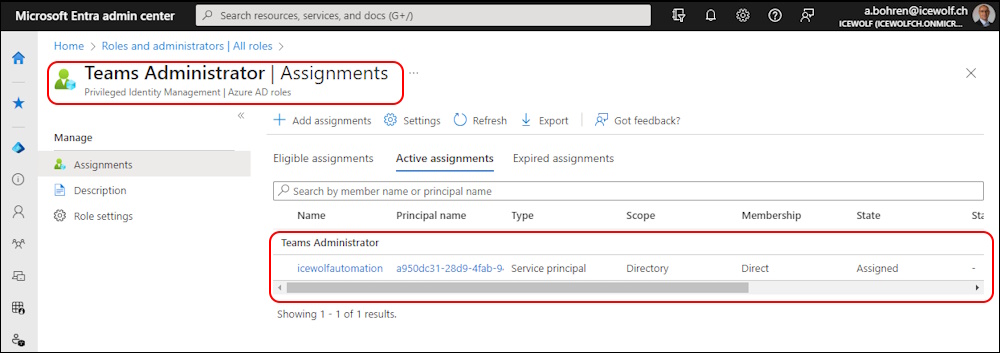
Last thing to do, is to add the Service Principal to the “Teams Administrator” Admin Role
###############################################################################
#Add Service Principal to Team Administrator
###############################################################################
$roleId = (Get-MgRoleManagementDirectoryRoleDefinition -Filter "DisplayName eq 'Teams Administrator'").id
New-MgRoleManagementDirectoryRoleAssignment -PrincipalId $SPID -RoleDefinitionId $roleId -DirectoryScopeId "/"

As you can see, the Service Principal is now member of the Role “Teams Administrator”
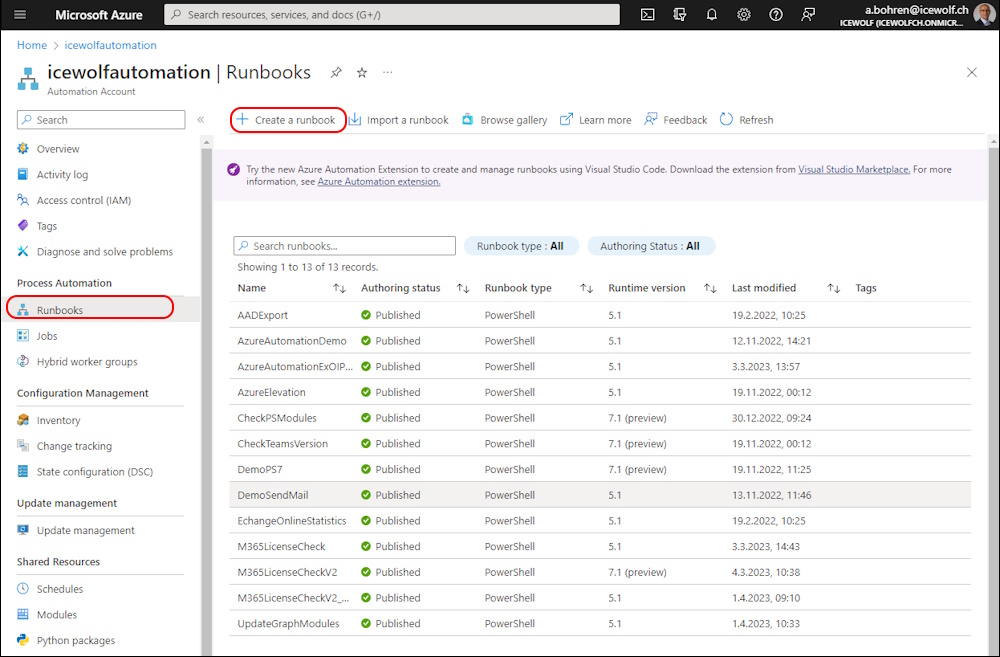
Create the Runbook
Now we can create the Azure Automation Runbook (basically the Script)
If you wan’t to know how to Deploy PowerShell 7 Script on Azure Automation i’ve written an Blog Article about that too.
Note: Be aware that you need to install the Microsoft Teams PowerShell Module for PowerShell 7.x if you want to use a PowerShell 7.x script.
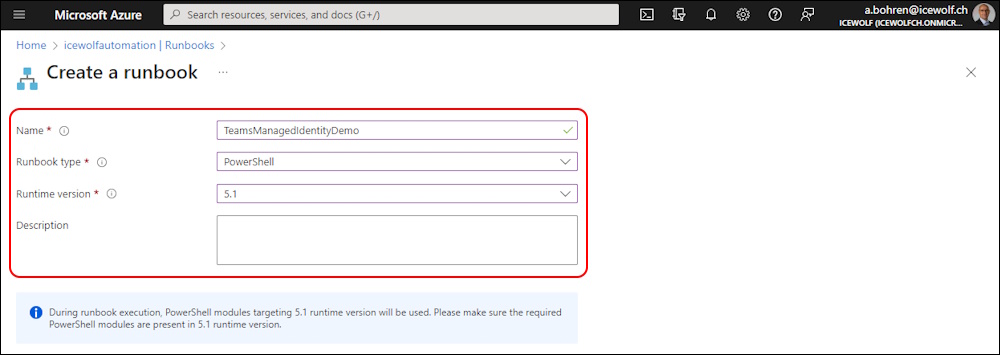
In Azure Automation > Runbooks > Create a Runbook
Fill out the Values
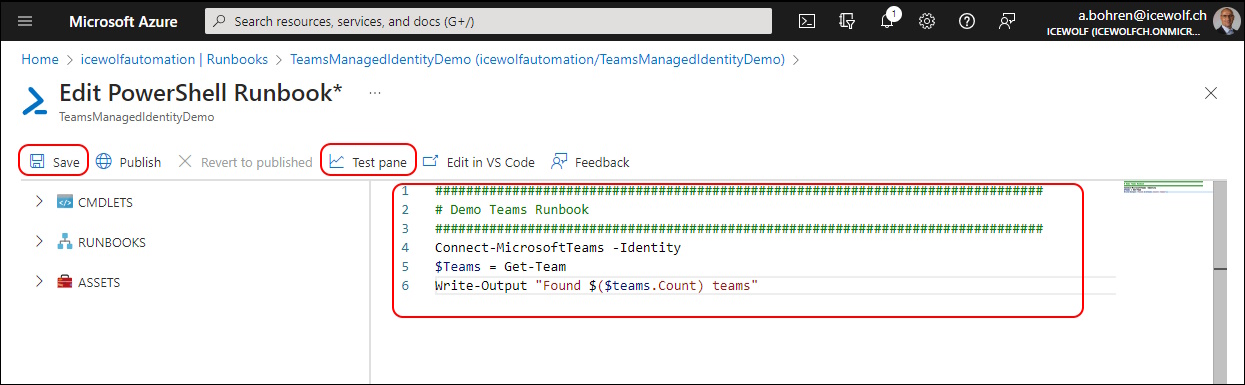
Copy the Script
###############################################################################
# Demo Teams Runbook
###############################################################################
Connect-MicrosoftTeams -Identity
$Teams = Get-Team
Write-Output "Found $($teams.Count) teams"
Disconnect-MicrosoftTeams
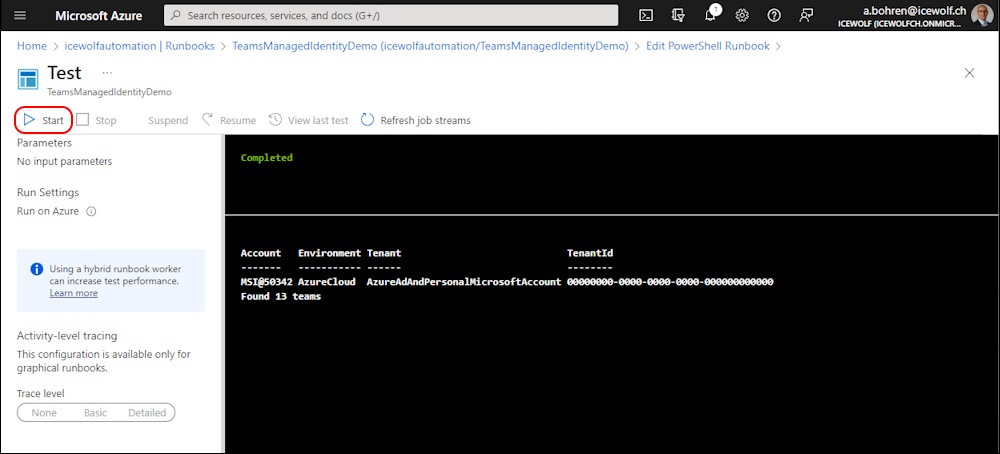
Hit the Play Icon and wait for the Output
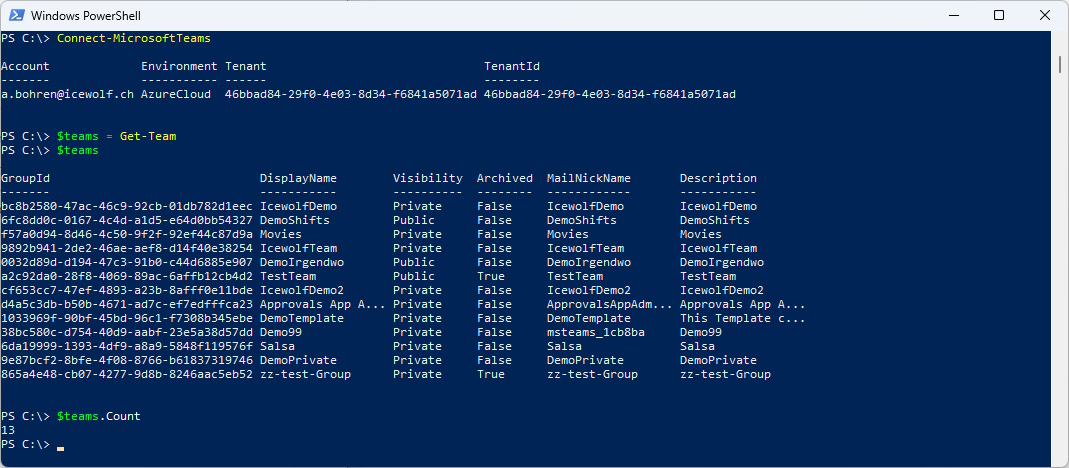
Test locally
Let’s compare to a locally installed MicrosoftTeams PowerShell Module.
Connect-MicrosoftTeams
$teams = Get-Team
$teams
$teams.Count
Get-CS* / Set-CS* Commands
Sadly the Skype for Business Commands Get-CS* / Set-CS* do not work.
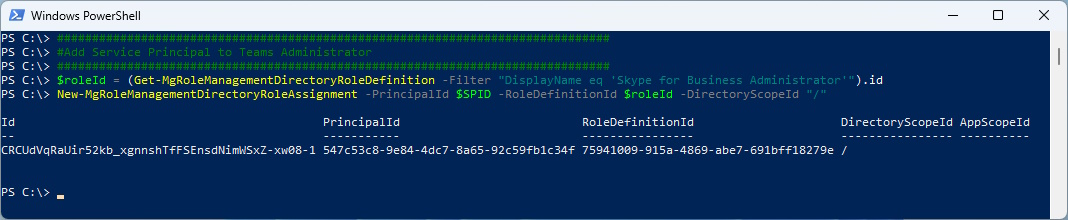
###############################################################################
#Add Service Principal to Skype for Business Administrator Role
###############################################################################
$roleId = (Get-MgRoleManagementDirectoryRoleDefinition -Filter "DisplayName eq 'Skype for Business Administrator'").id
New-MgRoleManagementDirectoryRoleAssignment -PrincipalId $SPID -RoleDefinitionId $roleId -DirectoryScopeId "/"
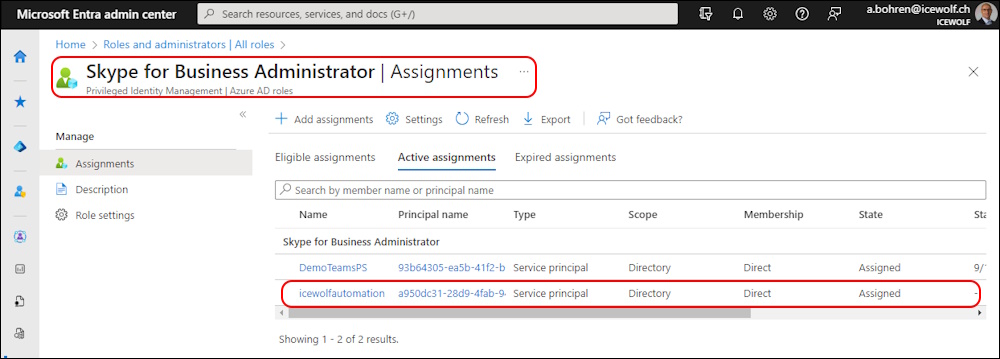
The Servce Principal is now Member of “Skype for Business Administrator” Role
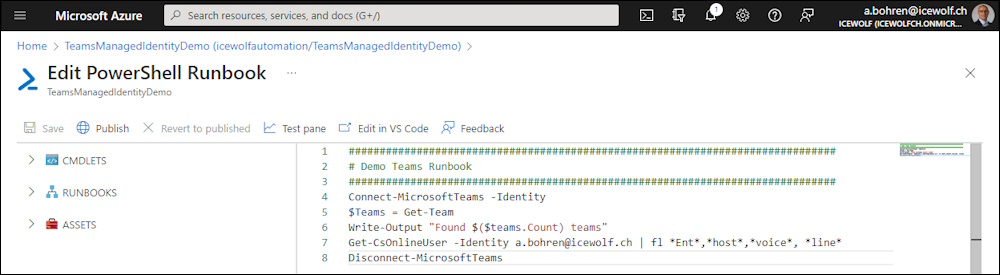
Extend the Runbook with Get-CsOnlineUser
###############################################################################
# Demo Teams Runbook
###############################################################################
Connect-MicrosoftTeams -Identity
$Teams = Get-Team
Write-Output "Found $($teams.Count) teams"
Get-CsOnlineUser -Identity a.bohren@icewolf.ch | fl *Ent*,*host*,*voice*, *line*
Disconnect-MicrosoftTeams
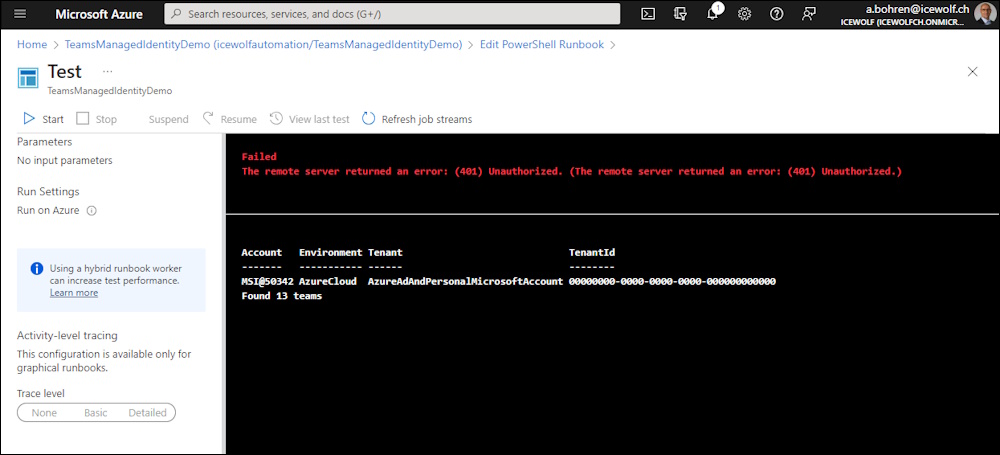
Now i get an Error ☹️
Summary
Now you know how to use MicrosoftTeams PowerShell Module with Managed Identity on Azure Automation.
By the way: All the Code in this Article is available in my GitHub Repo
Regards
Andres Bohren
Azure Logo PowerShell Logo Teams Logo![]()
![]()
![]()
![]()
![]()
![]()