
AI Shell in Windows Terminal Preview

Hi All,
I’ve heard about the AIShell on the MVPSummit back in March 2025 for the first time.
The release of AI Shell Preview 4 and the Blog Article released inspired me to write this Blog Article.
Prerequisites
- Windows 11 21H2 or higher
- Windows Terminal v1.19 or higher
- Azure CLI version 2.30.0 or higher installed and signed in to the allowed tenant
- PSRealdline 2.4.2-beta2
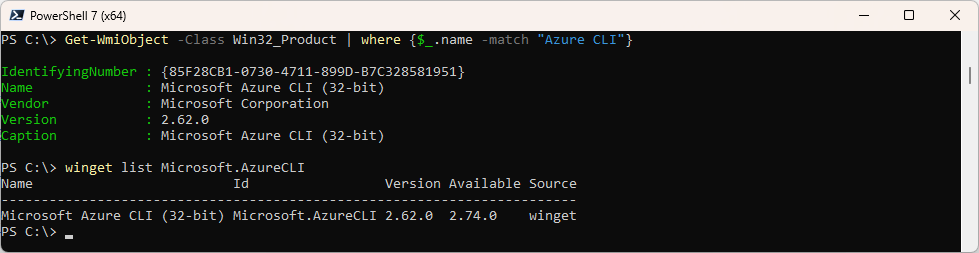
Let’s check the Azure CLI
#Installed Software
Get-WmiObject -Class Win32_Product | where {$_.name -match "Azure CLI"}

#winget
winget list Microsoft.AzureCLI
Now let’s check the Version of PSReadline
#Check Version of PSReadline
Get-InstalledPSResource -Name PSReadline

#Install
Find-PSResource -Name PSReadline -Prerelease
Install-PSRescource -Name PSReadline -Prerelease

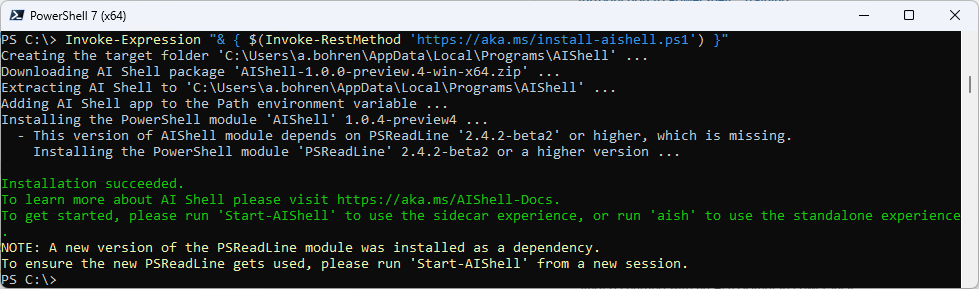
Install AI Shell
You can install the AI Shell in two ways.
Invoke-Expression "& { $(Invoke-RestMethod 'https://aka.ms/install-aishell.ps1') }"
Or
Install-PSResource -Name aishell -Scope CurrentUser -Prerelease
Get-InstalledPSResource -Name aishell

Deploy Azure OpenAI Service
As a Backend you need to have a AI - you can use OpenAI or Azure OpenAI
Deploy Azure OpenAI in Azure Portal
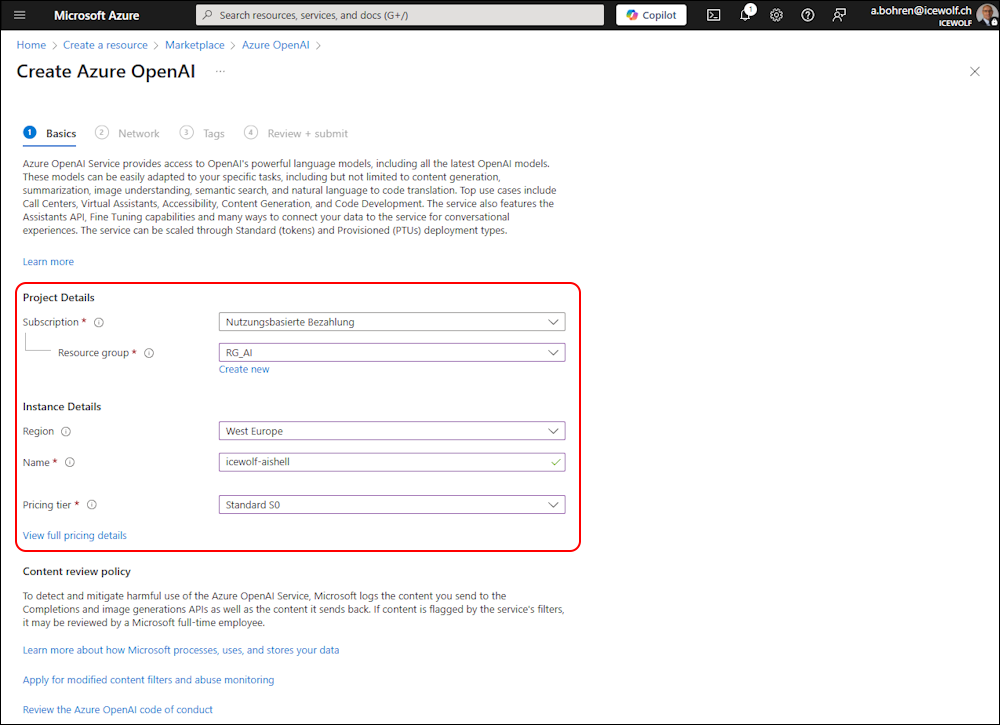
Create a resource

Search for “Azure OpenAI”
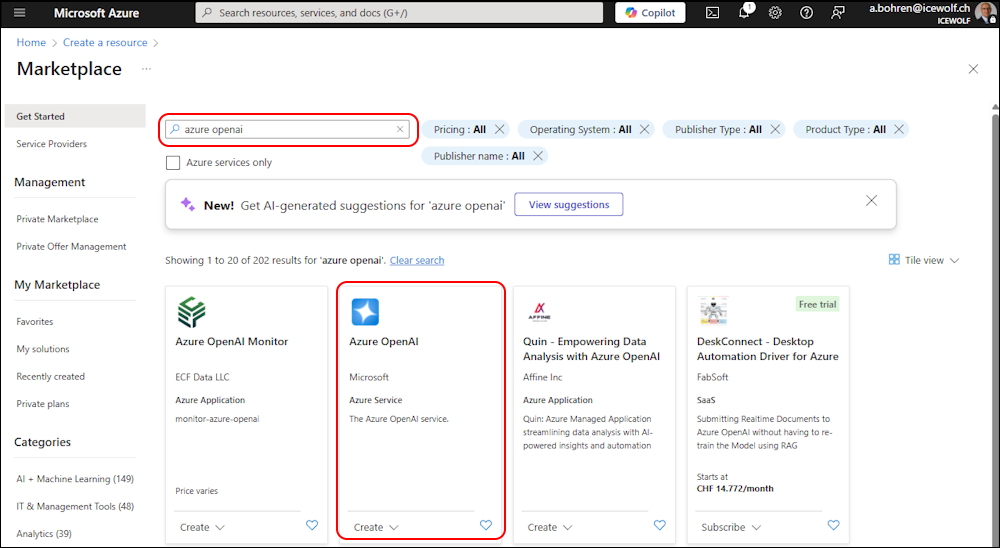
Create
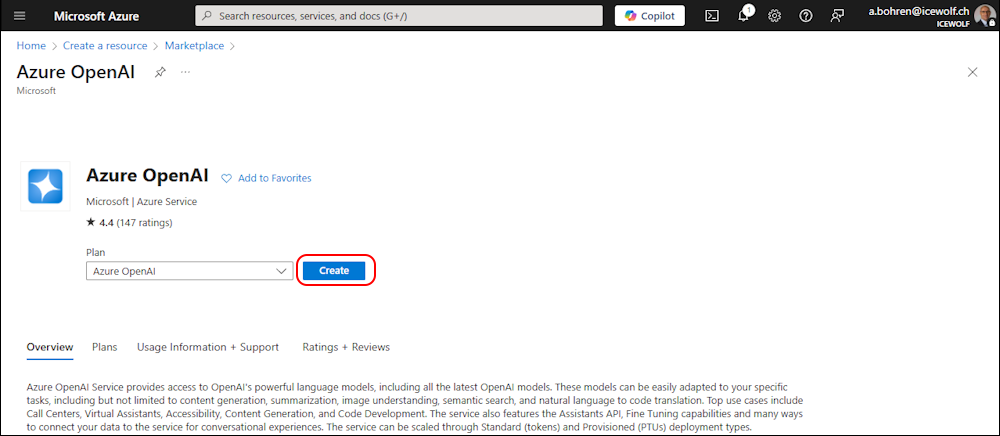
Select Subscription, Resourcegroup, Region, name and pricing tier
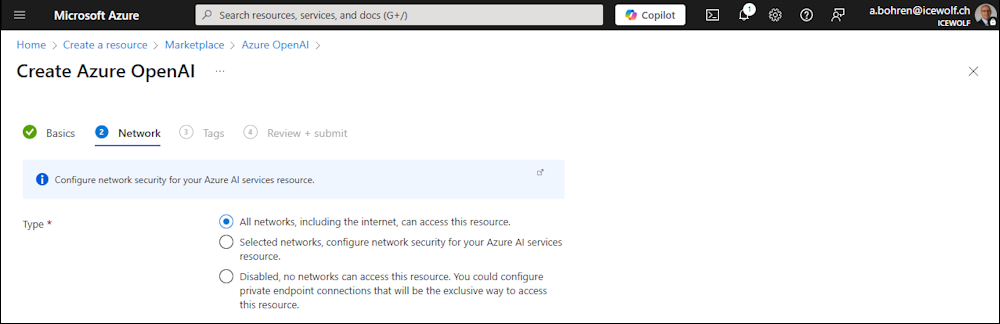
Select Network configuration
Tags if you want

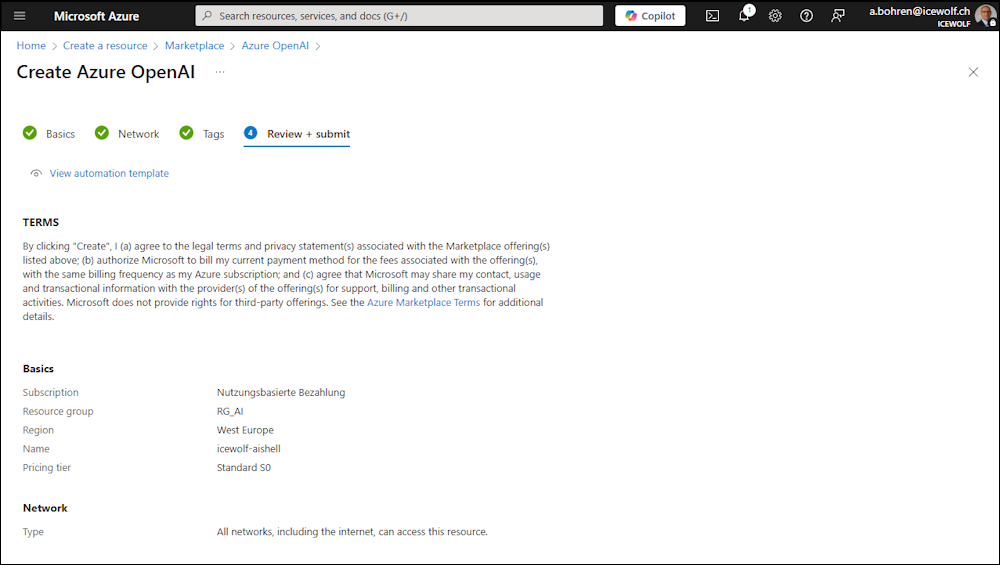
Review and submit
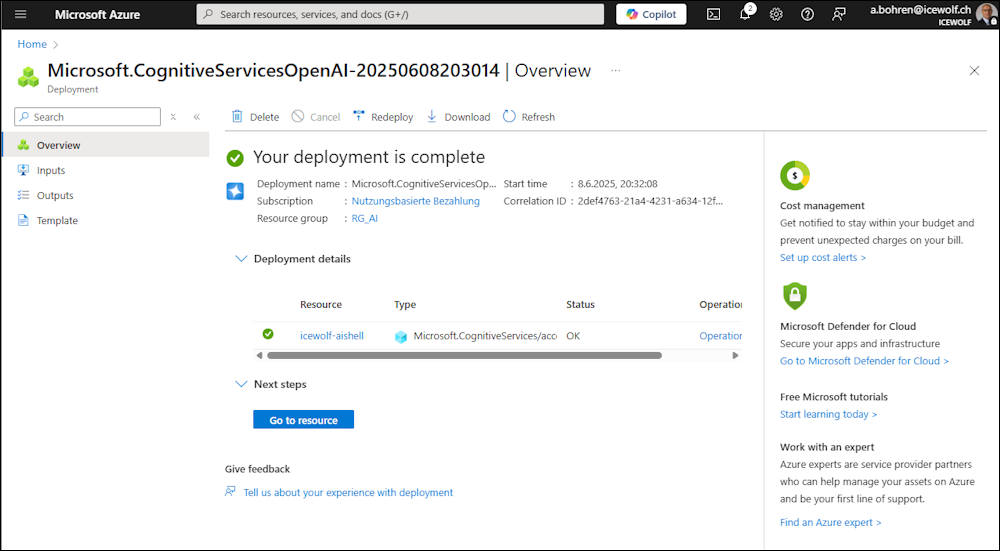
Deployment sucessful
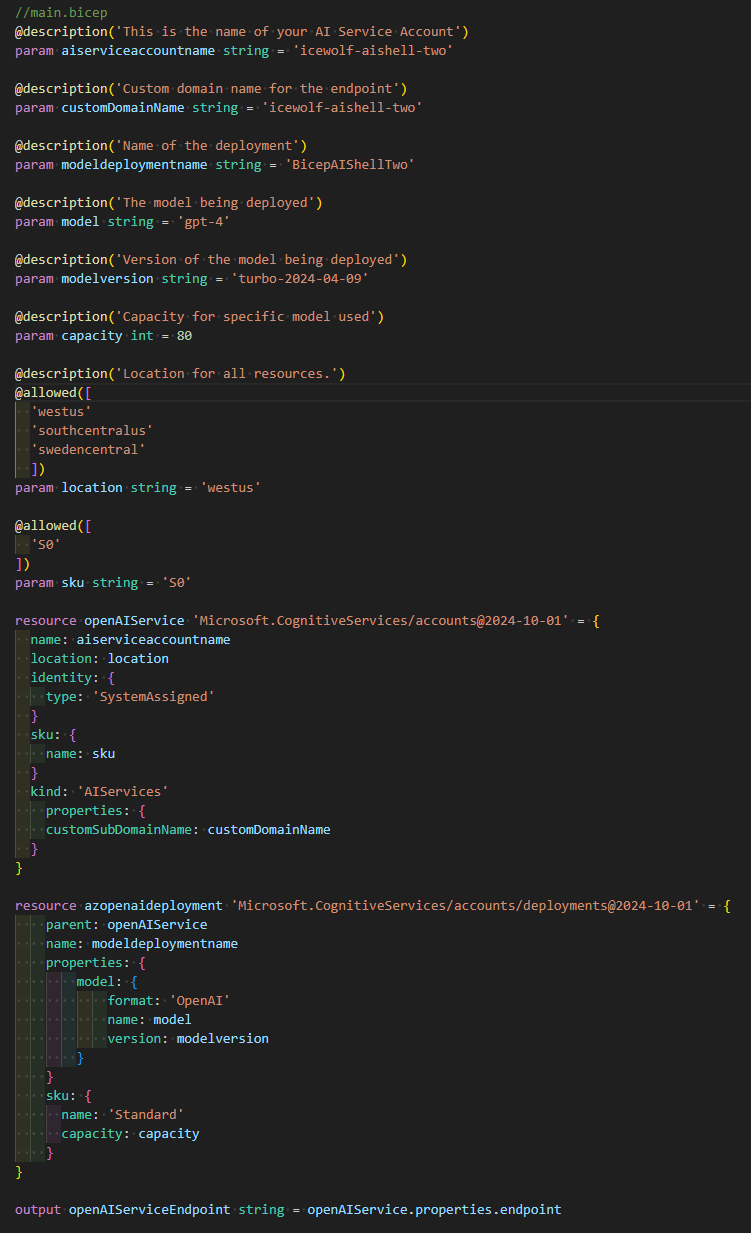
Deploy the Azure OpenAI Service using Bicep
Here is a way do deploy the Azure OpenAI with Bicep
I’ve struggled a bit until i realized that the Model “turbo-2024-04-09” is only available in three regions so i’ve modified the Example “main.bicep”
//main.bicep
@description('This is the name of your AI Service Account')
param aiserviceaccountname string = 'icewolf-aishell-two'

@description('Custom domain name for the endpoint')
param customDomainName string = 'icewolf-aishell-two'

@description('Name of the deployment')
param modeldeploymentname string = 'BicepAIShellTwo'

@description('The model being deployed')
param model string = 'gpt-4'

@description('Version of the model being deployed')
param modelversion string = 'turbo-2024-04-09'

@description('Capacity for specific model used')
param capacity int = 80

@description('Location for all resources.')
@allowed([
  'westus'
  'southcentralus'
  'swedencentral'
  ])
param location string = 'westus'

@allowed([
  'S0'
])
param sku string = 'S0'

resource openAIService 'Microsoft.CognitiveServices/accounts@2024-10-01' = {
  name: aiserviceaccountname
  location: location
  identity: {
    type: 'SystemAssigned'
  }
  sku: {
    name: sku
  }
  kind: 'AIServices'
    properties: {
    customSubDomainName: customDomainName
  }
}

resource azopenaideployment 'Microsoft.CognitiveServices/accounts/deployments@2024-10-01' = {
    parent: openAIService
    name: modeldeploymentname
    properties: {
        model: {
            format: 'OpenAI'
            name: model
            version: modelversion
        }
    }
    sku: {
      name: 'Standard'
      capacity: capacity
    }
}

output openAIServiceEndpoint string = openAIService.properties.endpoint
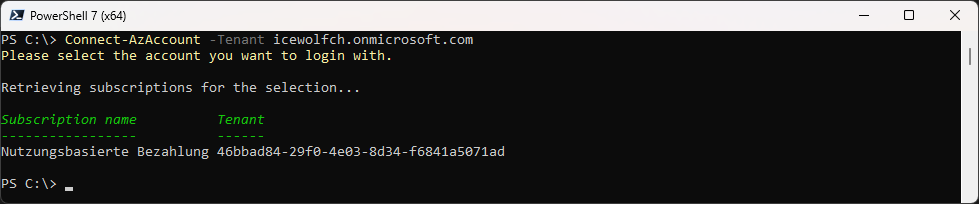
Connect with AZ PowerShell to Azure
Connect-AzAccount -Tenant icewolfch.onmicrosoft.com
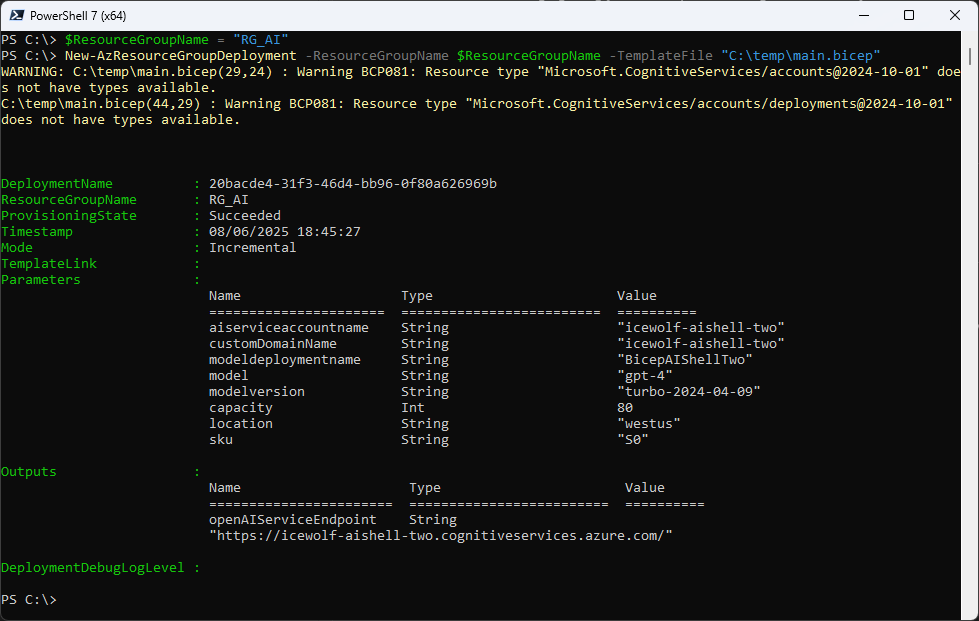
Deploy the Bicep File
$ResourceGroupName = "RG_AI"
New-AzResourceGroupDeployment -ResourceGroupName $ResourceGroupName -TemplateFile "C:\Temp\main.bicep"
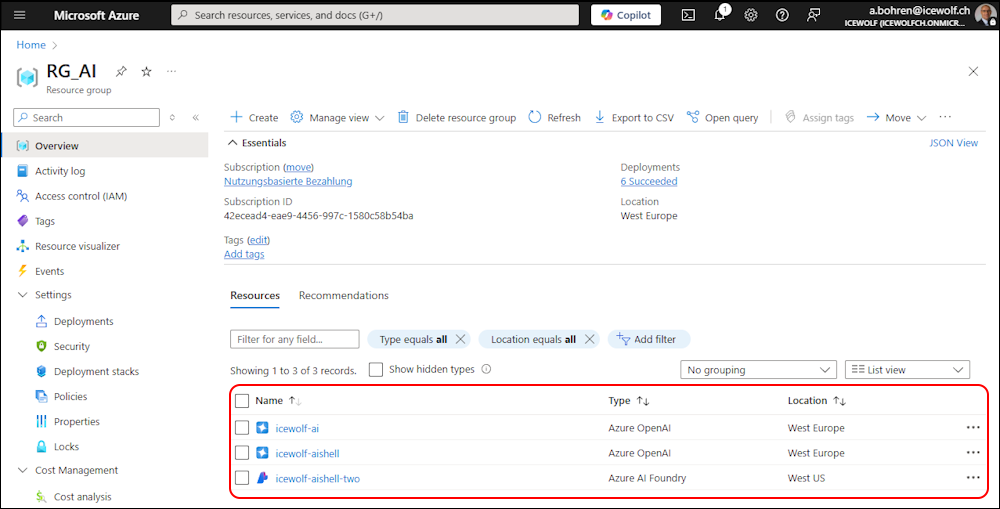
This is how the Azure Resources in the ResourceGroup “RG_AI” look like
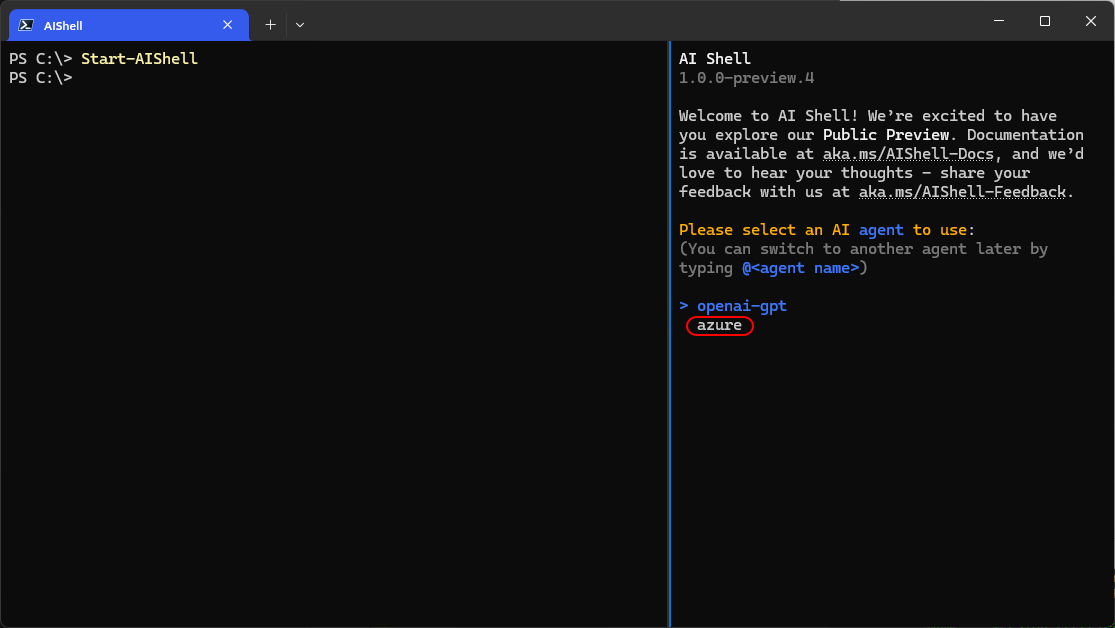
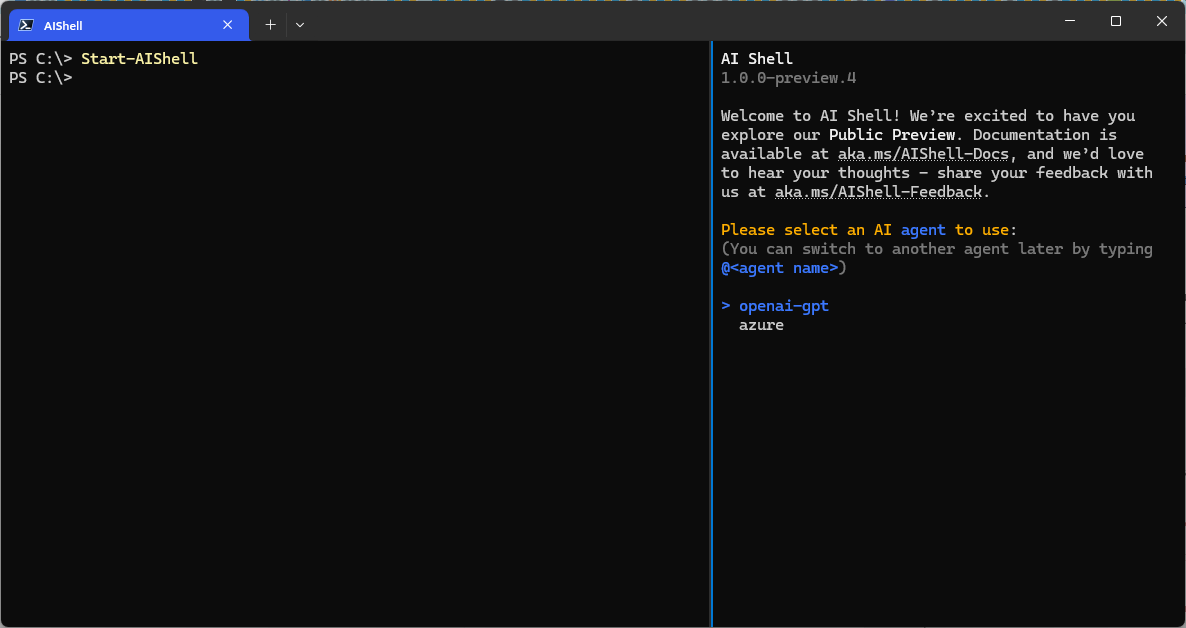
Start AI Shell in Windows Terminal
Start AI Shell in Windows Terminal and select “azure”
Start-AIShell
Now you are ready to chat with the AI
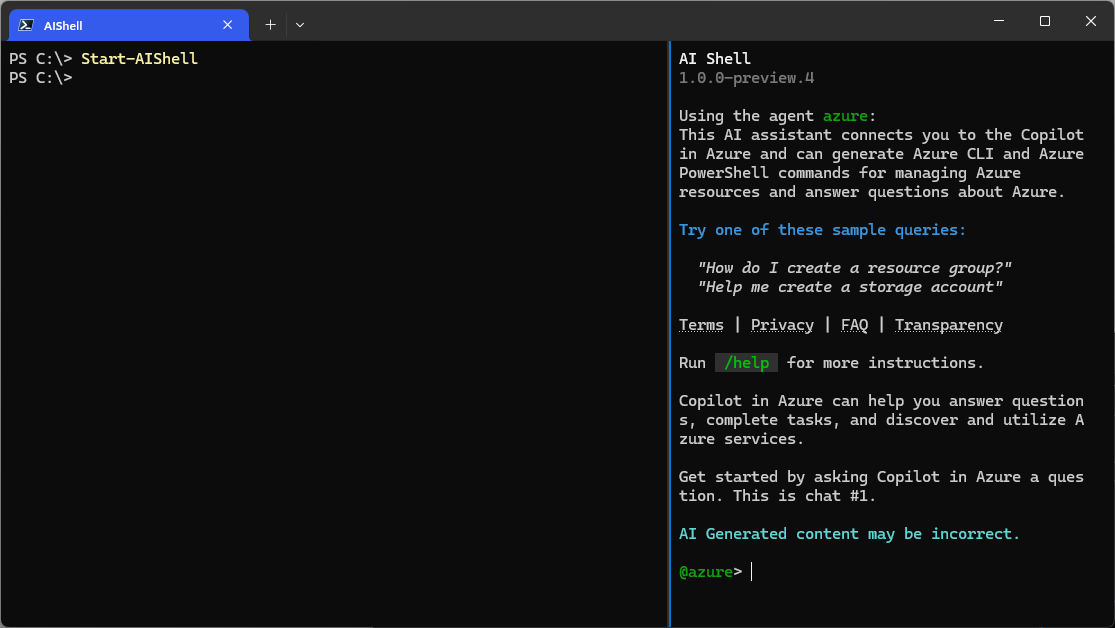
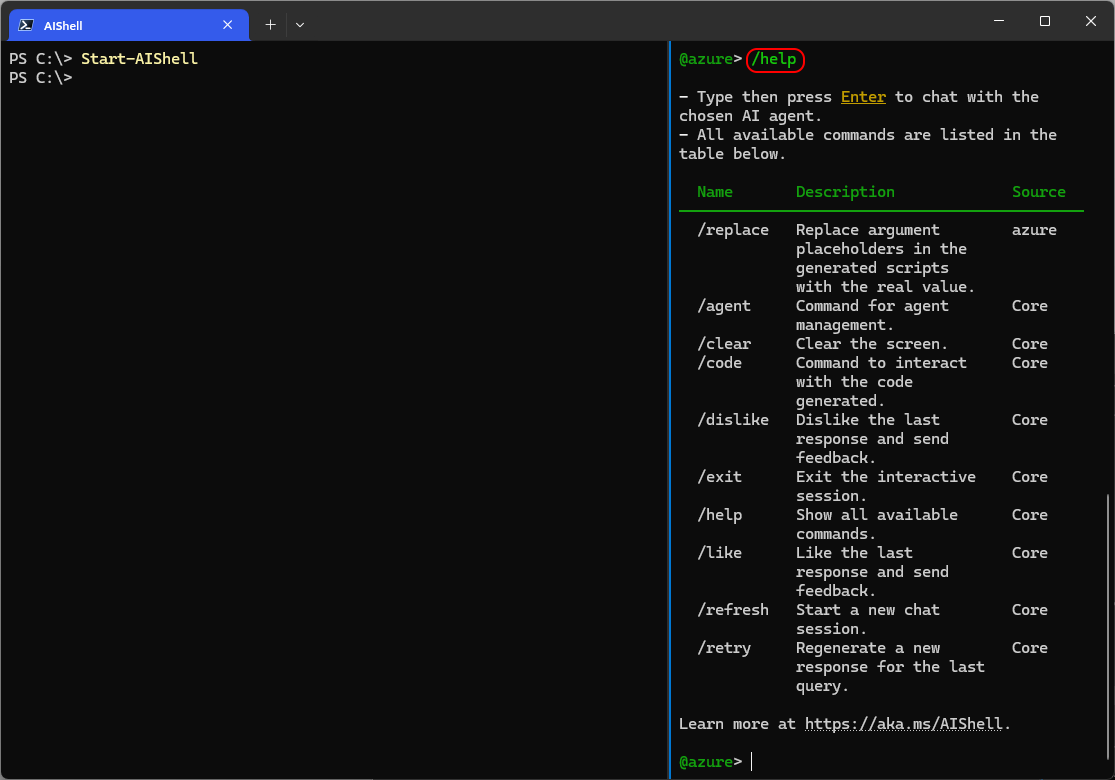
Using AI Shell
Use /help to show the commands in AI Shell
/help
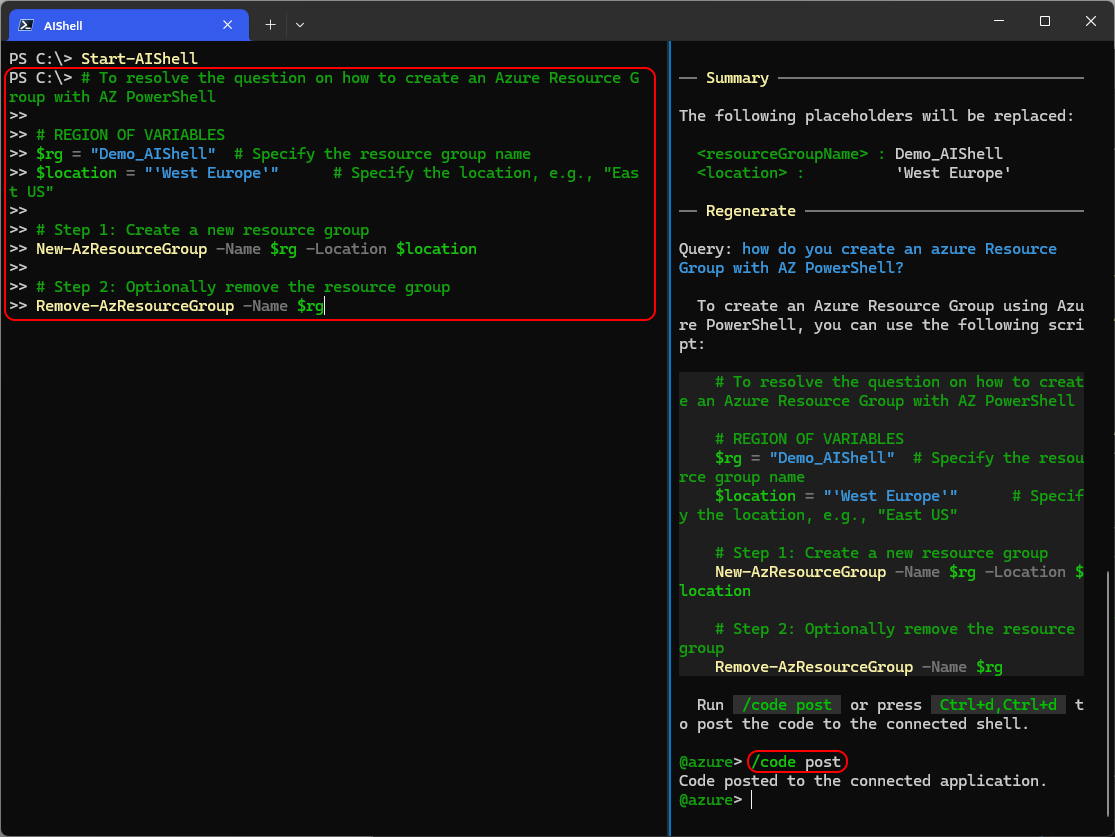
Let’s try something
How do you create an Azure Resource Group with AZ PowerShell?

With the “/replace” command you can edit the Variables
/replace
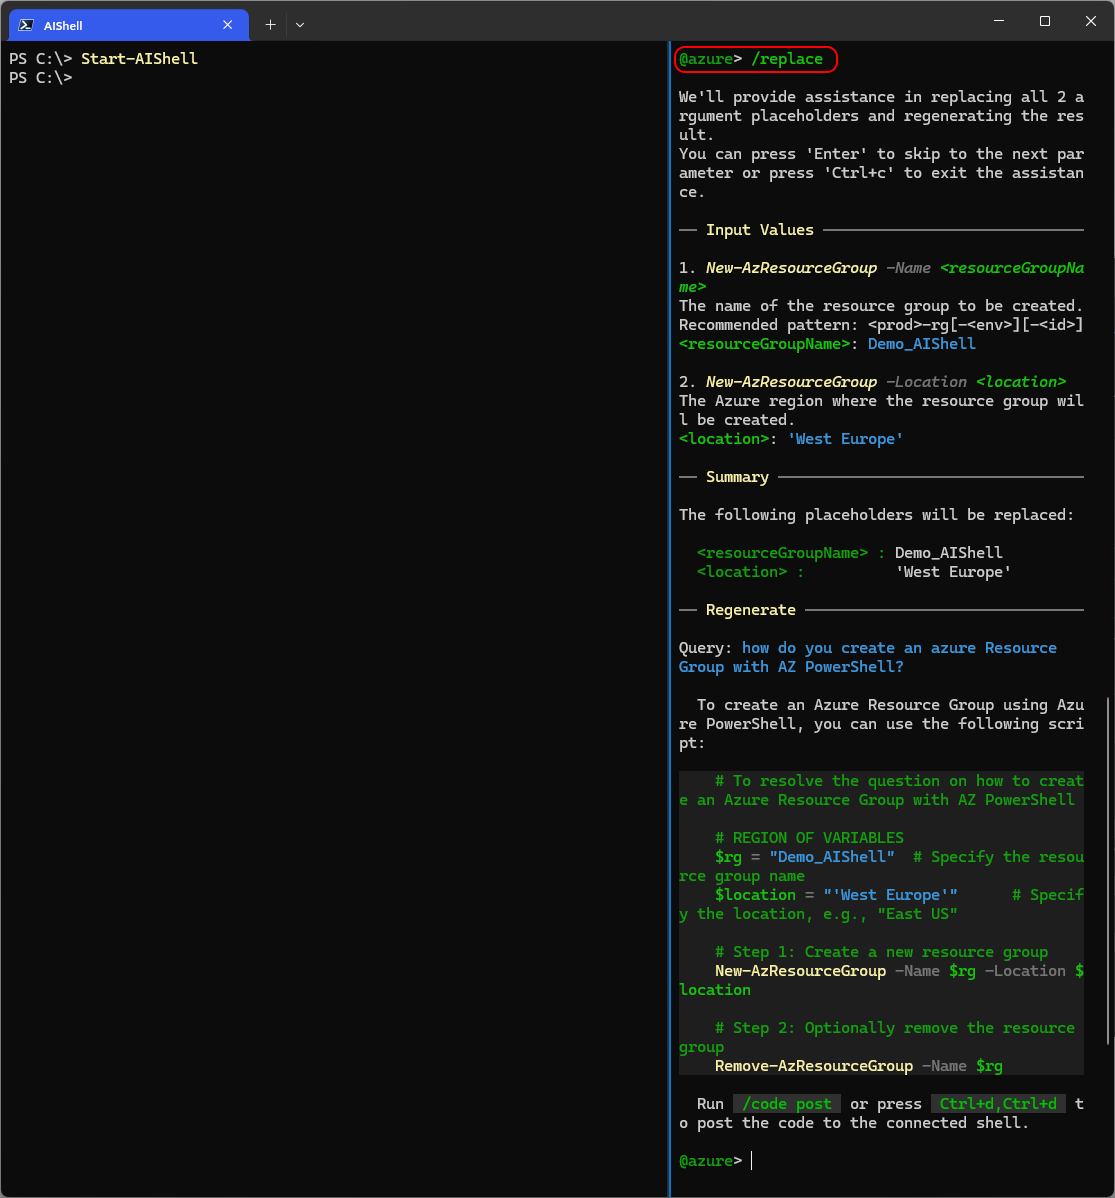
With “/code post” you can send the commands to the PowerShell Window on the left
/code post
Get the endpoint and key of the deployment
Let’s get the Endpoint
$AccountName = "icewolf-aishell-two"
$ResourceGroupName = "RG_AI"
Get-AzCognitiveServicesAccount -ResourceGroupName $ResourceGroupName -Name $AccountName | fl AccountName, Endpoint

Let’s get the keys
Get-AzCognitiveServicesAccountKey -ResourceGroupName $ResourceGroupName -Name $AccountName | fl

Agent Config
use /agent config in AI Shell
/agent config
it opens up C:\users<username>.aish\agent-config\azure\azconfig.json
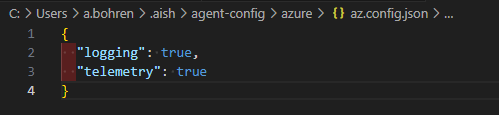
Add your configuration
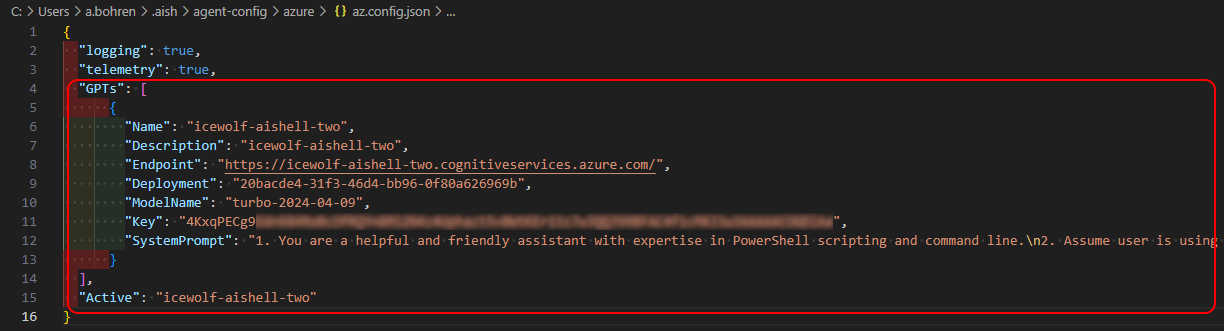
{
  "GPTs": [
      {
        "Name": "ps-az-gpt4",
        "Description": "<insert description here>",
        "Endpoint": "<insert endpoint here>",
        "Deployment": "<insert deployment name here>",
        "ModelName": "gpt-4",
        "Key": "<insert key here>",
        "SystemPrompt": "1. You are a helpful and friendly assistant with expertise in PowerShell scripting and command line.\n2. Assume user is using the operating system `osx` unless otherwise specified.\n3. Use the `code block` syntax in markdown to encapsulate any part in responses that is code, YAML, JSON or XML, but not table.\n4. When encapsulating command line code, use '```powershell' if it's PowerShell command; use '```sh' if it's non-PowerShell CLI command.\n5. When generating CLI commands, never ever break a command into multiple lines. Instead, always list all parameters and arguments of the command on the same line.\n6. Please keep the response concise but to the point. Do not overexplain."
      }
  ],
  "Active": "ps-az-gpt4"
}
After that id didn’t expect to have to select the azure agent or to see the name i’ve configured
Summary
You have learned how to install and use the AI Shell in Windows Terminal. Now it’s time to use it and figure out how this fits your work.
Regards
Andres Bohren
Azure Logo PowerShell Logo![]()
![]()
![]()
![]()